
Once upon a time, pete_the_duck wrote an excellent guide to Halo 3's pan-cam: a wondrous tool that allows players to see things far outside the playable area of the game maps. Now, Halo: Reach is out, and with it came a multitude of new maps to explore, both inside the confines Bungie put up for us and outside of them.

Halo: Reach, however, is an entirely new game, and the pancam, too, has changed. Ever since I posted the video which gave us a closer look at the Master Chief 'statue' left behind in Lone Wolf, I've been getting friend requests and messages of people who want to know how I did it. This guide is for them. This is...
BlueNinja's amazing pan-cam guide!
As you all know, Halo: Reach includes a Theater suite. We've all used this suite to take screenshots, record clips, or just watch our actions from a different angle. There is, however, a lot more to the Theater than initially meets the eye.
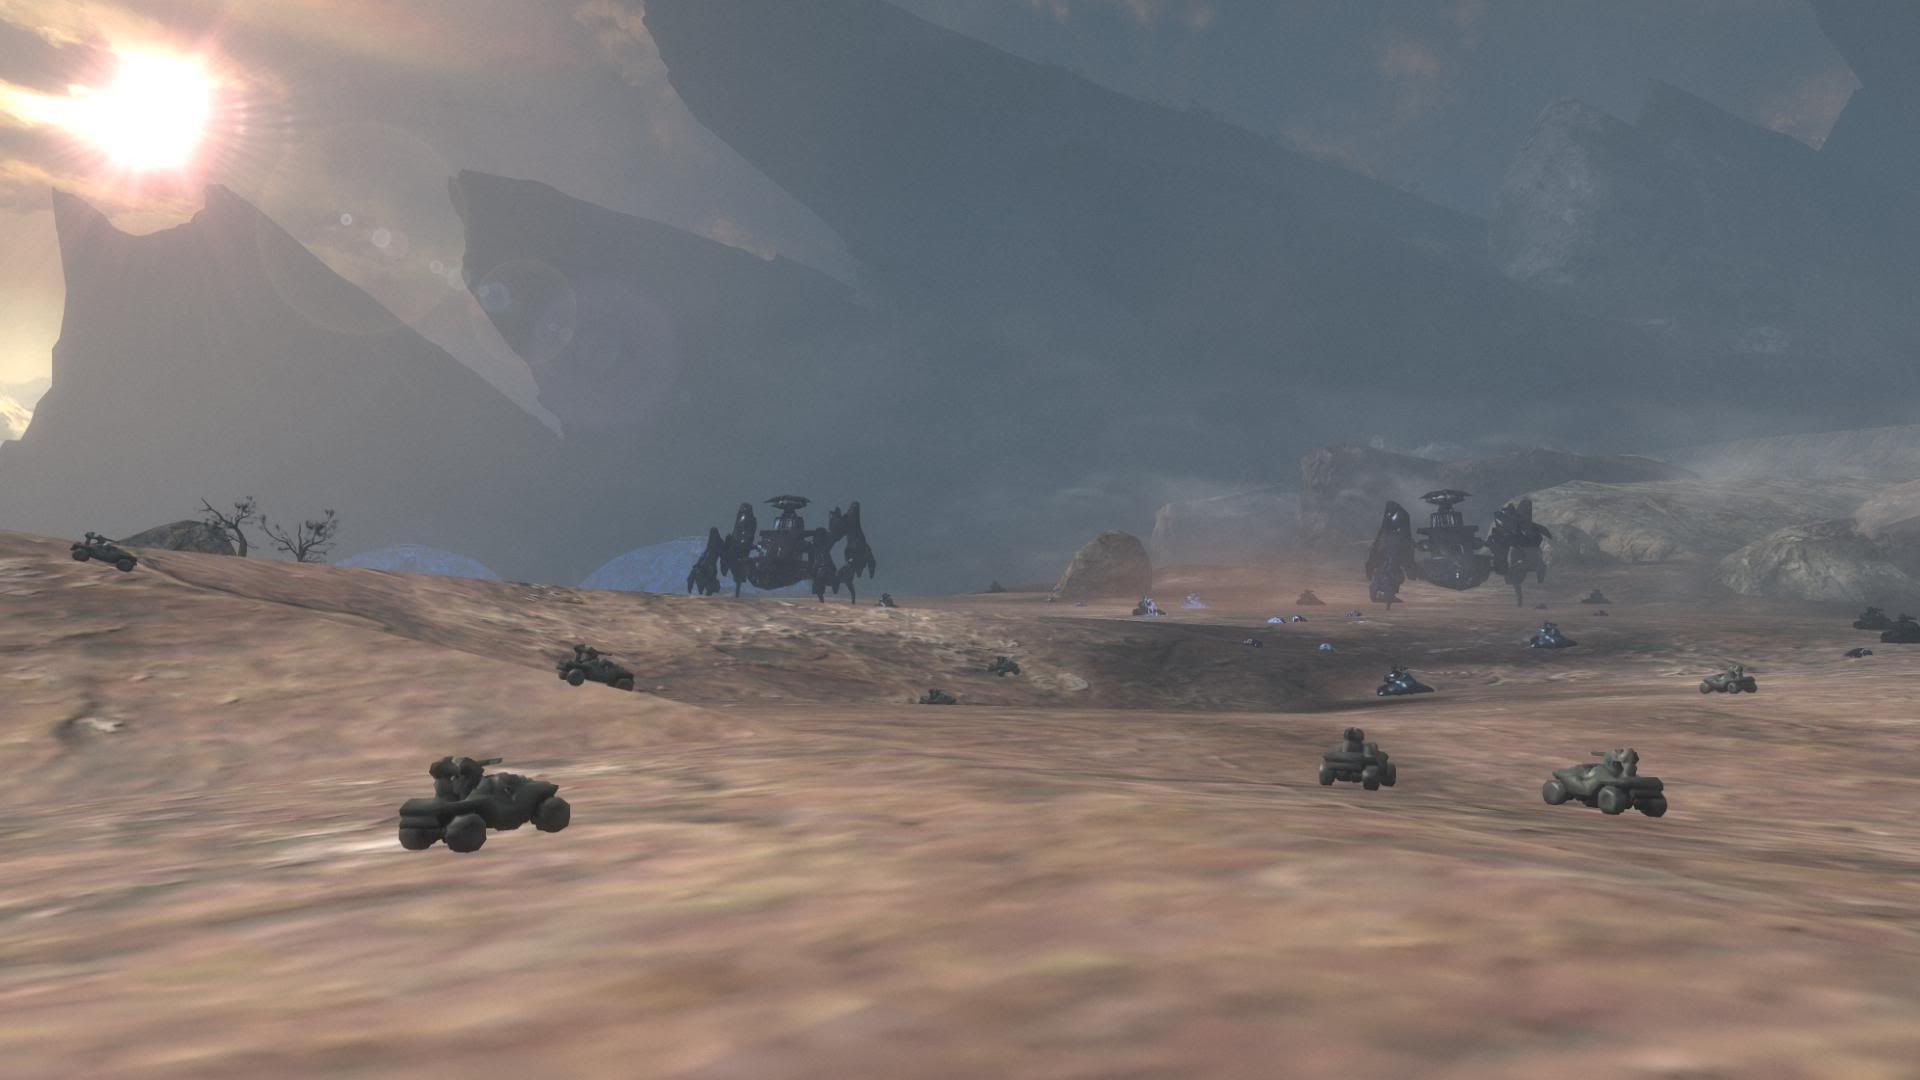
Bungie put a lot of effort into creating highly detailed worlds for us to explore, but then cuts us off from all the interesting parts by erecting multiple kill barriers and invisible walls. Deep down, however, we're all explorers: we all want to see what lies over the next hill, even if it is a gaping unrendered hole leading to Oblivion itself. With the miraculous tool called pancam, we can.

But how does one use this pancam, I hear you asking? Well, good sirs, ladies and androgynous cyborgs, I have the answers you crave! By following a few simple steps, you too can break barriers, explore, and basically see a lot of stuff Bungie never intended players to see. You can then, too, share this stuff with the world!
How to use Pan-cam
The pan-cam in Reach behaves similarly to the one found in Halo 3, but there are some key differences. I'll point these differences out as we go along. But enough talk, let's get started, shall we?
Step 1: Start a local Custom or Campaign game. To change your network to local, press the 'Y'-button in the lobby, and select 'My Xbox 360 Console'.
Step 2: Once you assume direct control of your character (see what I did there?), press and hold down your Reload and Switch Grenades-button, your Right Stick and UP on the D-Pad for a few seconds.
Step 3: If all goes well, a line of white text should appear near the top left-hand corner of your screen. This text should include the word "NORMAL". If it doesn't, repeat the second step.
Step 4: Now, hold down the two sticks and LEFT on the D-Pad. If all goes well, the word "NORMAL" will now change to "PANCAM". If it doesn't, repeat step 4.
Step 5: A good idea would be to activate pan-cam, reach a checkpoint, save and quit the game, and then resume from last checkpoint. The pan-cam should still be active, and immediately work in Theater mode, as well.
Step 6: Kill yourself. Not literally, of course, in-game. A preferred method of death would be one where your body is removed from the playable space, by jumping from a cliff or dying as the Monitor in Forge. You can repeat this a couple of times, if you wish. Save and quit when you're finished.
Step 7: Go to the Theater Lobby, and load up the saved film of the shenanighans you just committed in the name of Science.
Step 8: Pan-cam should already be active once you load up the film. What happens next depends on the type of film you have.
Step 11 (Optional): During your panoramic travels across the map, you will undoubtedly have encountered the 'hard' barriers that surround the map. If your desire for exploration has not yet been quenched, you will be happy to hear there is a way around those, too. It required some ingenuity, however. First, make sure your pan-cam speed is set to 100.000. Secondly, make sure your body is removed from the play space (or hasn't appeared yet, if you use the "Back"-trick in a campaign game.)
- Long Night of Solace
- Exodus
- The Pillar of Autumn
- Lone Wolf
- Forge World
- Boardwalk

Have any remarks? Post them! Constructive criticism is always appreciated.
Step 6: Kill yourself. Not literally, of course, in-game. A preferred method of death would be one where your body is removed from the playable space, by jumping from a cliff or dying as the Monitor in Forge. You can repeat this a couple of times, if you wish. Save and quit when you're finished.
Step 7: Go to the Theater Lobby, and load up the saved film of the shenanighans you just committed in the name of Science.
Step 8: Pan-cam should already be active once you load up the film. What happens next depends on the type of film you have.
- If it's a campaign film (in which you didn't remove your body from the playable area), press pause, open up the Menu (by pressing X), and use the 'BACK'-option to rewind completely to the start of the game. You should now find the camera outside of the map. Press the 'Y' button twice, and you'll be able to roam freely. You cannot record films using this method.
- If it's a film in which your body does disappear from the playable area, make sure to detach the camera before your character goes over the edge. Once you've died, pause the film (before your character respawns). The map's "soft" barriers will now be removed, and you'll be able to roam freely. You can record films using this method, but only for a few seconds.
Step 9: Notice that '1.000' in front of the word 'Pan-cam'? That's the current speed of your flying camera. You can raise this by holding down the UP-button on the D-pad, and lower it again by holding down the DOWN-button on the D-pad. Increase your camera speed to 100.000.
NOTE: Now is the perfect time to get used to the pan-cam controls. The triggers control altitude now instead of the bumpers, and there is no way to fast-forward anymore.
Step 10: Now, just fly your camera around. Explore! Have fun!
Once you've seen everything there is to see, you may want to proceed to the next step.
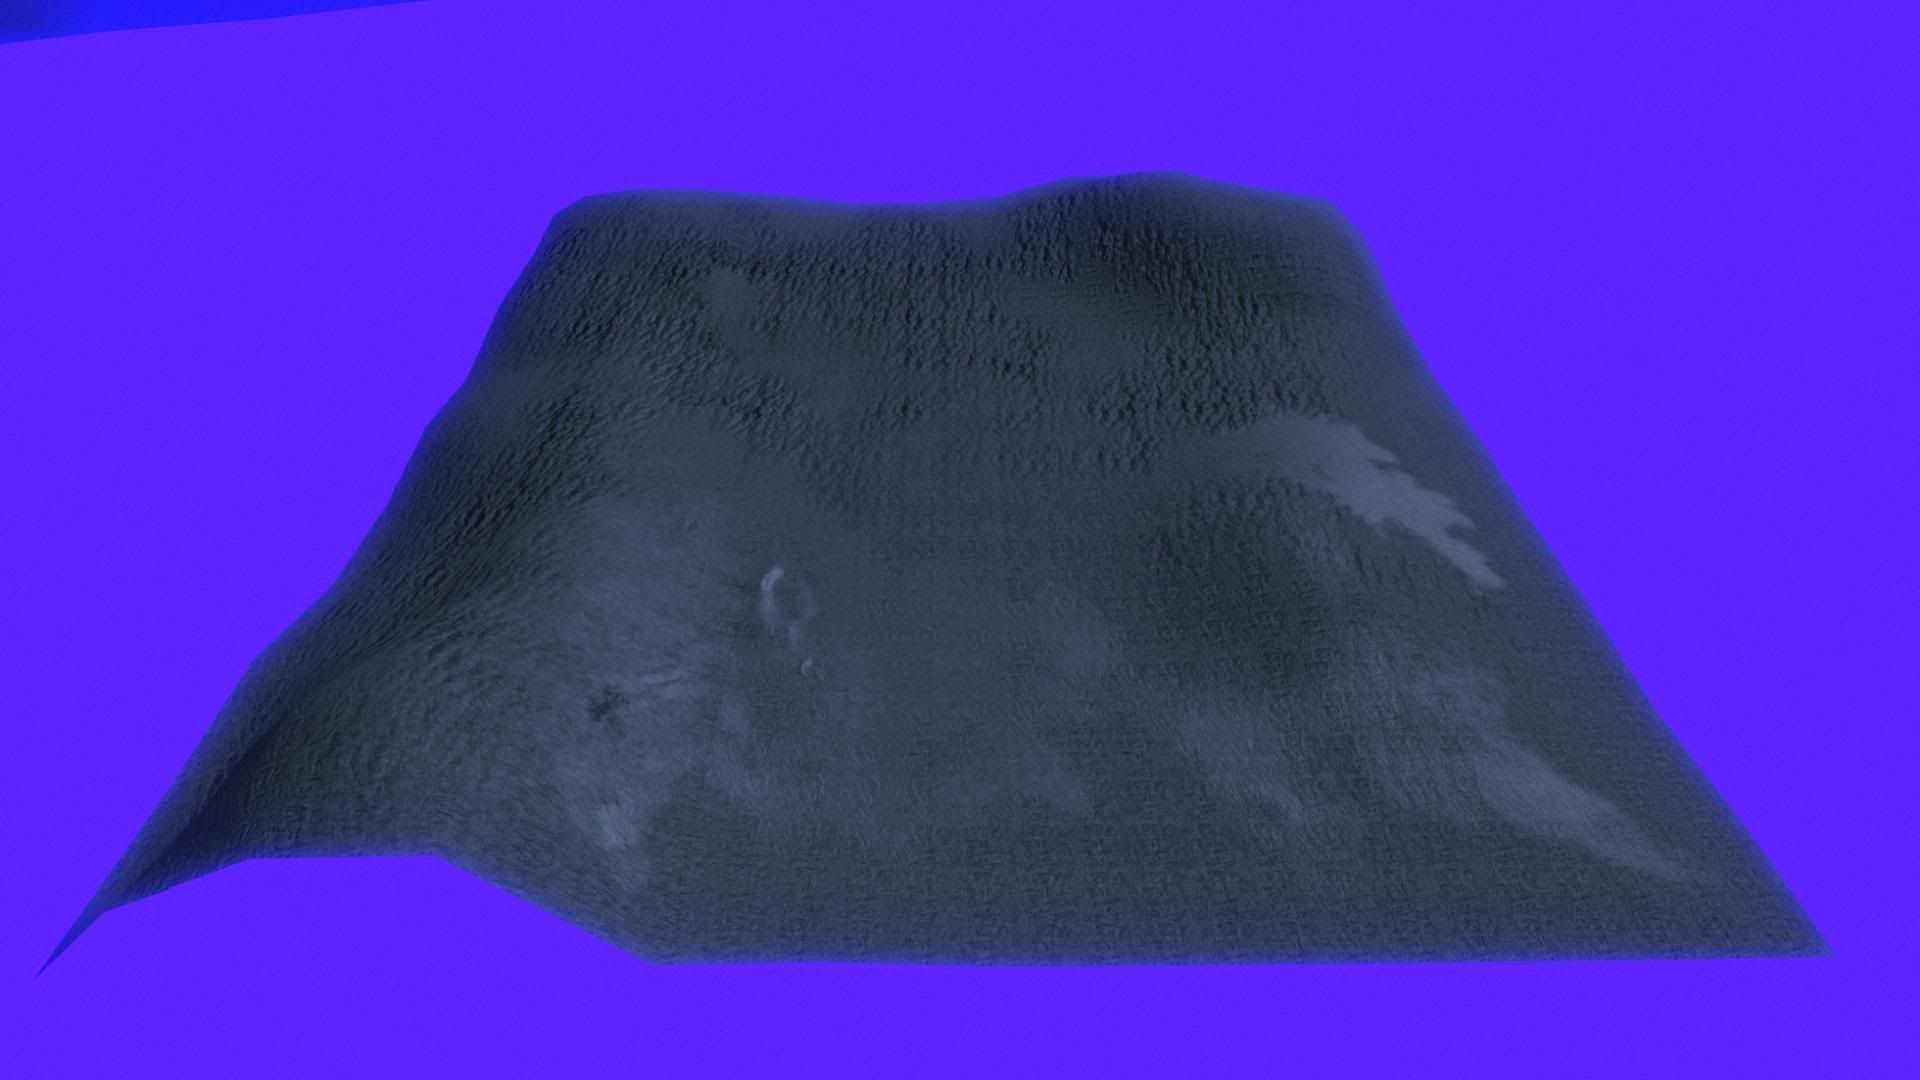
NOTE: While the speed in Halo: Reach's pan-cam can't be bumped up to such high amounts as in Halo 3, activating pan-cam now automatically disables the 'soft' barriers Bungie put up around their maps. The lower speed of the pan-cam cannot pierce the outer 'hard' barriers, however.
NOTE: While the speed in Halo: Reach's pan-cam can't be bumped up to such high amounts as in Halo 3, activating pan-cam now automatically disables the 'soft' barriers Bungie put up around their maps. The lower speed of the pan-cam cannot pierce the outer 'hard' barriers, however.
Step 11 (Optional): During your panoramic travels across the map, you will undoubtedly have encountered the 'hard' barriers that surround the map. If your desire for exploration has not yet been quenched, you will be happy to hear there is a way around those, too. It required some ingenuity, however. First, make sure your pan-cam speed is set to 100.000. Secondly, make sure your body is removed from the play space (or hasn't appeared yet, if you use the "Back"-trick in a campaign game.)
Step 12 (Optional): Now, go hunting. Nearly every map has a "gap" in its outer walls, usually along the top or the bottom of the walls. Find the outer edges (the corner between the bottom and the side walls usually works best). Make note of your height coordinates (the third set of digits). Once you've reached the bottom, they'll stop going down. Keep the trigger held down, and move along the edges.
Step 13 (Optional): Eventually, you'll hit a gap, and start descending again. Congratulations, you have now succesfully breached Bungie's outer defenses. Move backwards out of the map, and then move in any direction you please. There's always more stuff to find. For instance, you can use the coordinates you see in cutscenes to reach their in-game locations. If you've tried fruitlessly to find a gap, proceed to the next step.
Step 14 (Optional): Some maps aren't easy to breach. Long Night of Solace, for instance, has a barrier that is, quite frankly, a pain in the ass. However, there exists a way to emulate the speed of the pan-cam from Halo 3, and shatter those whimsical barriers like they're nothing. At the start of the film, use the back-function. Press Y twice, and you'll find yourself outside of the map, with the pan-cam text disabled. Occasionally, you'll be able to break out of the map entirely from this location, but that only happens few and far between. When it happens, you'll also lose the pan-cam coordinates, and have no idea where you actually are.
Step 15 (Optional): Switch to 'Normal' mode, instead of Pan-cam. You can do this by holding down both sticks and LEFT on the D-pad. The camera now functions as it does normally, though still at the 100.000 speed. When in Normal mode, however, you've got access to the 'Boost-'function, which severely kicks up your camera speed.
Step 16 (Optional): This step will be familiar to those who've ever broken out of a Halo 3 map. Hold down your boost button, go crazy across the map, and use the bumpers to play with your hight. Eventually, you'll smash through the outermost barriers, and find yourself outside of the map. Success!
NOTE: If you breach the outer walls, eventually the game will use a "blue cloud" to cover up too-distant locations. The size of the maps Bungie uses can put quite a strain on an Xbox to render in its entirety. Don't be disappointed if everything looks a bit "funky", that's just the way it works. Glitches when taking screenshots may occur, too.
This is a list of the maps I've broken through the hard barriers of. If you find a way to breach those not yet mentioned, let me know!
- Long Night of Solace
- Exodus
- The Pillar of Autumn
- Lone Wolf
- Forge World
NOTE: On Long Night of Solace, I've only breached the outer barriers of the first section. So far, the barriers surrounding the space sections of the level have gone unbreached.
Have any remarks? Post them! Constructive criticism is always appreciated.